Installation
BiaPy can be installed and run locally on any Linux, Windows, or macOS system using Docker, or via the command line using a package manager like Conda, Mamba, and Git or pip. Additionally, BiaPy can be seamlessly installed and used on Google Colab through our code-free notebooks. Each of these approaches is designed to cater to different user experience levels, so choose the installation method that best fits your expertise.

Prerequisites
If your system has one or more GPUs, ensure your NVIDIA drivers are up to date.
For Docker and graphical user interface (GUI) installations: Virtualization Technology must be enabled in your BIOS. Follow this guide for instructions on how to enable it.
Choose your installation method
Download the corresponding BiaPy GUI for you OS:
Then, to use the GUI you will need to install Docker in your operating system. You can follow these steps:
In Windows you will need to install Docker Desktop with Windows Subsystem for Linux (WSL) activated. There is a good video on how you can do it here. Manually, the steps are these:
Install Ubuntu inside WSL. For that open PowerShell or Windows Command Prompt in administrator mode by right-clicking and selecting Run as administrator and type the following:
wsl --install
This command will enable the features necessary to run WSL and install the Ubuntu distribution of Linux. Then restart your machine and you can do it again so you can check that it is already installed.
Once the installation ends it will ask for a username and a password. This is not necessary, exit the installation by using Ctrl+C or by closing the window.
Then you need to make Ubuntu the default Linux distribution. List installed Linux distributions typing:
wsl --list --verbose
The one with * is the default configuration. So, if it is not Ubuntu, it can be changed by using the command:
wsl --set-default Ubuntu
Install Docker Desktop.
After installation, verify that Docker Desktop is properly configured:
Open the Docker Desktop application.
Navigate to Configuration (gear icon in the top-right corner).
Under the General tab, ensure the option for WSL 2 is enabled.
Tip
If you’re using a GPU, check the official documentation on GPU support in Docker Desktop for additional setup instructions.
Then, the only thing you need to do is double-click on the BiaPy binary (application) file you downloaded.
You may run into a message telling you that “BiaPy” is an unrecognized app when running it. This message occurs if an application is unrecognized by Microsoft. In this situation you can click in More info button and Run anyway. These steps are depicted in the figure below:
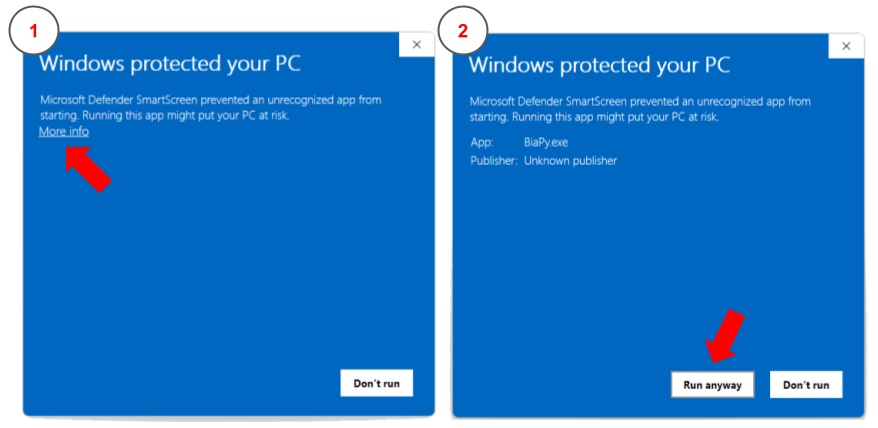
How to bypass the security error message when executing BiaPy app in Windows.
You need to install either Docker Desktop (friendlier but not open source) or Docker Engine (open source but command line only).
If you follow the steps and still have problems, you may need to add your user to docker group:
sudo usermod -aG docker $USER
newgrp docker
To grant execution permission to the binary, enter the following command in a terminal:
chmod +x BiaPy
Then, simply run it:
./BiaPy
You need to install Docker Desktop.
Then, the only thing you need to do is double-click on the BiaPy binary (application) file you downloaded.
In the latest versions of macOS, you may run into a message telling you that “BiaPy-macOS” can’t be opened because Apple cannot check it for malicious software. In that case, follow these instructions to be able to run BiaPy in your Mac.
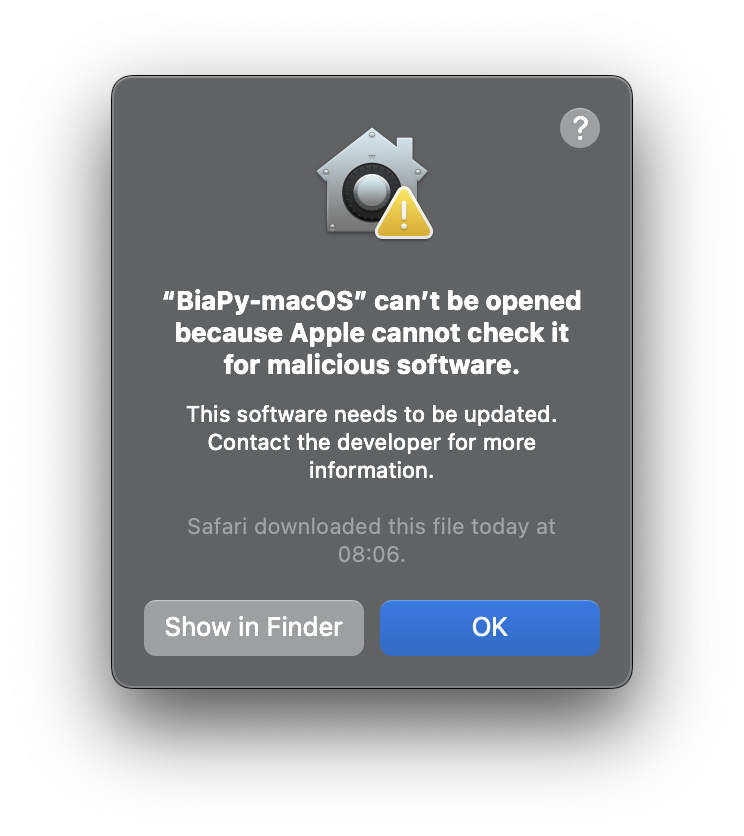
Security error message when executing BiaPy app in macOS.
To bypass it, follow these instructions.
Note
Whenever you want to run BiaPy’s GUI you need to start Docker Desktop first.
No special setup is required other than a browser on your PC. To run any of the BiaPy workflows, simply click the “Open in Colab” button in the “How to run” section of the corresponding workflow configuration page. All available workflows are listed in the menu on the left.
BiaPy is available as a tool in the Galaxy platform, enabling users to run biomedical image analysis workflows through an intuitive, web-based interface without requiring any local installation. The tool can be accessed directly from the Galaxy ToolShed at this link, and it can also be found by searching for ‘biapy’ in the Galaxy ToolShed interface here here.
We provide a Docker container for running BiaPy called biapyx/biapy:latest-11.8 (link to the container.). It is based on Ubuntu 22.04 with Pytorch 2.4.0 and CUDA 11.8 support.
To install Docker in your operating system, you can follow these steps:
To run BiaPy on Windows, you’ll need to install Docker Desktop with Windows Subsystem for Linux (WSL) enabled. You can follow this helpful video tutorial here. Below are the steps to get started:
Install Ubuntu inside WSL:
Open PowerShell or the Windows Command Prompt in administrator mode by right-clicking and selecting Run as administrator.
Run the following command:
wsl --installThis command will enable the necessary features to run WSL and install the Ubuntu Linux distribution. After running the command, restart your machine. You can then run the command again to confirm that Ubuntu has been installed.
During the installation, you may be prompted to create a username and password. This step is not necessary for our purposes; you can exit the installation by pressing Ctrl+C or simply closing the window.
Set Ubuntu as the default Linux distribution:
To check which Linux distributions are installed, type:
wsl --list --verbose
The default distribution is marked with an asterisk (*). If Ubuntu is not set as the default, you can change it by running:
wsl --set-default Ubuntu
Install Docker Desktop.
After installation, verify that Docker Desktop is properly configured:
Open the Docker Desktop application.
Navigate to Configuration (gear icon in the top-right corner).
Under the General tab, ensure the option for WSL 2 is enabled.
Tip
If you’re using a GPU, check the official documentation on GPU support in Docker Desktop for additional setup instructions.
You need to install either Docker Desktop (friendlier but not open source) or Docker Engine (open source but command line only).
If you follow the steps and still have problems, you may need to add your user to docker group:
sudo usermod -aG docker $USER
newgrp docker
You need to install Docker Desktop.
Note
Whenever you want to run BiaPy through Docker you need to start Docker Desktop first.
To use BiaPy via the command line, you will need to set up a conda environment. To do this, you will first need to install Conda. Then choose one of the following options based on your machine capabilities:
A. GPU-capable machine (NVIDIA GPU)
conda config --set channel_priority strict
conda create -n BiaPy_env -c conda-forge python=3.11 biapy pytorch-gpu
conda activate BiaPy_env
Verify GPU at runtime:
python -c 'import torch; print(torch.__version__)'
>>> 2.9.1
python -c 'import torch; print(torch.cuda.is_available())'
>>> True
B. CPU-only machine
conda config --set channel_priority strict
conda create -n BiaPy_env -c conda-forge python=3.11 biapy
conda activate BiaPy_env
Before you begin, ensure you have Mamba installed. Mamba is a faster alternative to Conda and can be used to manage your conda environments. Once you have mamba installed you will to choose one of the following options based on your machine capabilities:
A. GPU-capable machine (NVIDIA GPU)
mamba create -n BiaPy_env -c conda-forge python=3.11 biapy pytorch-gpu
mamba activate BiaPy_env
Verify GPU at runtime:
python -c 'import torch; print(torch.__version__)'
>>> 2.9.1
python -c 'import torch; print(torch.cuda.is_available())'
>>> True
B. CPU-only machine
mamba create -n BiaPy_env -c conda-forge python=3.11 biapy
mamba activate BiaPy_env
Set up a conda/mamba environment:
mamba create -n BiaPy_env -c conda-forge python=3.11
mamba activate BiaPy_env
Clone BiaPy repository:
git clone https://github.com/BiaPyX/BiaPy.git
Install PyTorch first, choosing GPU if available. Use the official PyTorch selector for your platform (CUDA / ROCm / CPU). Example (CUDA, just as an example-use the selector’s exact command):
pip install torch torchvision --index-url https://download.pytorch.org/whl/cu118
Install BiaPy in editable mode:
cd BiaPy
pip install -e .
If you want to use BiaPy as a library in your own Python scripts, you can install it via pip:
pip install biapy
or via conda/mamba:
conda install -c conda-forge biapy
Once installed you will need to install PyTorch, choosing GPU if available. Use the official PyTorch selector for your platform (CUDA / ROCm / CPU). Example (CUDA, just as an example—use the selector’s exact command):
pip install torch torchvision --index-url https://download.pytorch.org/whl/cu118
After that you can import BiaPy in your Python scripts:
import biapy
You can find more information in the following sections:
Library examples that show how to use BiaPy as a library in your own Python scripts.
API documentation for more information on how to use BiaPy as a library in your own Python scripts.
The next step consists in selecting the specific workflow that aligns with your intended use.