LightMyCells challenge: self-supervised Vision Transformers for image-to-image labeling (Paper)
This tutorial aims to reproduce the results reported in the following paper:
Franco-Barranco, Daniel, et al. "Self-supervised Vision Transformers for image-to-image
labeling: a BiaPy solution to the LightMyCells Challenge." 2024 IEEE 21th International
Symposium on Biomedical Imaging (ISBI). IEEE, 2024.
In this work, we address the Cell Painting problem within the LightMyCells challenge at the International Symposium on Biomedical Imaging (ISBI) 2024, aiming to predict optimally focused fluorescence images from label-free transmitted light inputs. We used the image to image workflow to solve this problem, where the goal is to learn a mapping between an input image and an output image. We leverage four specialized four UNETR-like models, each dedicated to predicting a specific organelle, and pretrained in a self-supervised manner using MAE.
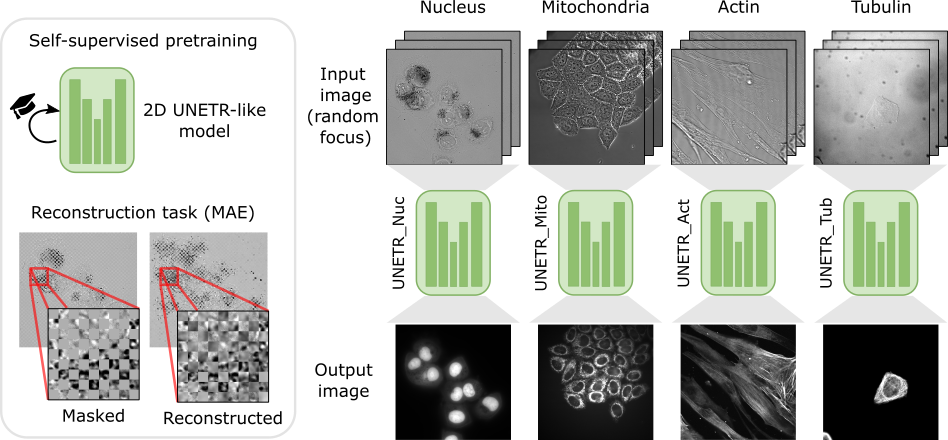
Schematic representation of our organelle-specialized 2D UNETR approach. The base model is a modified UNETR architecture pretrained using MAE. Then, four specialized models are fine-tuned independently for identifying specific organelles using an image-to-image workflow with heavy data augmentation.
We refer the reader to our paper to check all details of our approach. Preprint: 10.1101/2024.04.22.590525 .
Data preparation
Currently, LightMyCells challenge data can be downloaded in the challenge’s page (registration is needed). In the near future the organizers will publish the data in the BioImage Archive.
You can use the lightmycell_data_preparation.py script available here to organize your data directory structure. This script converts the Study_* folder arrangement from the challenge into the data organization required by BiaPy.
In our proposed approach we implemented a custom data loader to handle more than one out-of-focus image. To ensure the proper operation of the library the data directory tree should be something like this (here actin training data as example):
For the new images you want to predict (test data), you can follow the same directory structure or just put all the images in a directory. You can use the validation folder.
Run
For that you need to download the templates of our four specialized models:
Nucleus lightmycells_nucleus.yaml
Mitochondria lightmycells_mito.yaml
Actin lightmycells_actin.yaml
Tubulin lightmycells_tubulin.yaml
Then you need to modify DATA.TRAIN.PATH with your training data microscopy image path, and DATA.TRAIN.GT_PATH with the path to the target images. In the same way, do it for the validation data with DATA.VAL.PATH and DATA.VAL.GT_PATH. We use 10% of the training samples as validation, taking one sample every ten, so all studies are covered, and saving it into a separated folder so they are not used for training. Regarding the test, by setting DATA.TEST.PATH, you can use the same validation path. As an example, if you follow the data structure presented above DATA.TRAIN.PATH should be lightmycells_dataset/train/x and DATA.TRAIN.GT_PATH should be lightmycells_dataset/train/y.
Then, you can train by you own those models or you can use directly our checkpoints:
To use our checkpoints you need to first download them (soon avaialable under Bioimage Model Zoo):
Nucleus lightmycells_nucleus.pth
Mitochondria lightmycells_mito.pth
Actin lightmycells_actin.pth
Tubulin lightmycells_tubulin.pth
You need to update each setting with the location of each checkpoint so BiaPy can find it (use the PATHS.CHECKPOINT_FILE variable). For example, for the nucleus, you need to change PATHS.CHECKPOINT_FILE to the location of your nucleus checkpoint, like this: /home/user/Downloads/lightmycells_nucleus.pth.
You can use our notebook prepared for just doing inference:
Inference notebook:

These steps assume that you have already installed BiaPy (instructions here). Then, open a terminal and run the following (here nucleus model is used as example):
# Configuration file
job_cfg_file=/home/user/lightmycells_nucleus.yaml
# Where the experiment output directory should be created
result_dir=/home/user/exp_results
# Just a name for the job
job_name=my_lightmycells_nucleus
# Number that should be increased when one need to run the same job multiple times (reproducibility)
job_counter=1
# Number of the GPU to run the job in (according to 'nvidia-smi' command)
gpu_number=0

# Load the environment
conda activate BiaPy_env

biapy \
    --config $job_cfg_file \
    --result_dir $result_dir  \
    --name $job_name    \
    --run_id $job_counter  \
    --gpu "$gpu_number"
Open a terminal as described in Installation and run the following (here nucleus model is used as example):
# Configuration file
job_cfg_file=/home/user/lightmycells_nucleus.yaml
# Path to the data directory
data_dir=/home/user/data
# Where the experiment output directory should be created
result_dir=/home/user/exp_results
# Just a name for the job
job_name=my_lightmycells_nucleus
# Number that should be increased when one need to run the same job multiple times (reproducibility)
job_counter=1
# Number of the GPU to run the job in (according to 'nvidia-smi' command)
gpu_number=0

docker run --rm \
    --gpus "device=$gpu_number" \
    --mount type=bind,source=$job_cfg_file,target=$job_cfg_file \
    --mount type=bind,source=$result_dir,target=$result_dir \
    --mount type=bind,source=$data_dir,target=$data_dir \
    biapyx/biapy:latest-11.8 \
        biapy \
        --config $job_cfg_file \
        --result_dir $result_dir \
        --name $job_name \
        --run_id $job_counter \
        --gpu "$gpu_number"
Note
Note that data_dir must contain all the paths DATA.*.PATH and DATA.*.GT_PATH so the container can find them. For instance, if you want to only train in this example DATA.TRAIN.PATH and DATA.TRAIN.GT_PATH could be /home/user/data/train/x and /home/user/data/train/y respectively.
For container versions prior to 3.6.8, the biapy prefix is not required. You can execute the command directly as follows:
docker run --rm \
    --gpus "device=$gpu_number" \
    --mount type=bind,source=$job_cfg_file,target=$job_cfg_file \
    --mount type=bind,source=$result_dir,target=$result_dir \
    --mount type=bind,source=$data_dir,target=$data_dir \
    biapyx/biapy:3.6.7-11.8 \
        --config $job_cfg_file \
        --result_dir $result_dir \
        --name $job_name \
        --run_id $job_counter \
        --gpu "$gpu_number"
There are two steps to have a fully trained model: phase one and phase two.
1) Phase one: pretraining
The first stage consists in the self-supervised pretraining using mask autoencoder technique. For that, you can use lightmycells_pretraining.yaml configuration file.
You will need to place all the images inside just one folder and NOT following the above data structure described, as that is for the main phase, which is the second one. Modify in the configuration file the DATA.TRAIN.PATH with the path to that folder. Currently BiaPy is not prepared to train without a validation data, so you can create a folder with a few training samples as a “fake” validation and set DATA.VAL.PATH with that folder’s path.
After that, you need to open a terminal as described in Installation and run the following commands. We strongly recommend using more than one GPU for these pretraining as using all the images it can take a lot of days with just one GPU:
# Configuration file
job_cfg_file=/home/user/lightmycells_pretraining.yaml
# Where the experiment output directory should be created
result_dir=/home/user/exp_results
# Just a name for the job
job_name=my_lightmycells_pretraining
# Number that should be increased when one need to run the same job multiple times (reproducibility)
job_counter=1
# Number of the GPU to run the job in (according to 'nvidia-smi' command)
gpu_number=0

# Load the environment
conda activate BiaPy_env

biapy \
    --config $job_cfg_file \
    --result_dir $result_dir  \
    --name $job_name    \
    --run_id $job_counter  \
    --gpu "$gpu_number"
# First check where is your biapy command (you need it in the below command)
# $ which biapy
# > /home/user/anaconda3/envs/BiaPy_env/bin/biapy

gpu_number="0,1,2,3,4,5,6,7"
python -u -m torch.distributed.run \
    --nproc_per_node=8 \
    /home/user/anaconda3/envs/BiaPy_env/bin/biapy \
    --config $job_cfg_file \
    --result_dir $result_dir  \
    --name $job_name    \
    --run_id $job_counter  \
    --gpu "$gpu_number"
nproc_per_node need to be equal to the number of GPUs you are using (e.g. gpu_number length).
2) Phase two: finetuning
In this phase we are going to reuse the pretrained model from the phase one and finetune the model into an image-to-image workflow. To do that, as the YAML configuration files are prepared for doing test/inferece, you need to enable the training by changing TRAIN.ENABLE to True. Also, you need to use the pretraining checkpoint of the phase one, which is in a folder called checkpoints under the pretraining experiment output folder (e.g. /home/user/exp_results/my_lightmycells_pretraining/checkpoints). Once found, set PATHS.CHECKPOINT_FILE variable with the path of that checkpoint.
After that, you need to open a terminal as described in Installation and run the following commands. We strongly recommend using more than one GPU for nucleus and mitochondria, as the amount of data for those organelles is large. In these commands nucleus model is used as example:
# Configuration file
job_cfg_file=/home/user/lightmycells_nucleus.yaml
# Where the experiment output directory should be created
result_dir=/home/user/exp_results
# Just a name for the job
job_name=my_lightmycells_nucleus
# Number that should be increased when one need to run the same job multiple times (reproducibility)
job_counter=1
# Number of the GPU to run the job in (according to 'nvidia-smi' command)
gpu_number=0

# Load the environment
conda activate BiaPy_env

biapy \
    --config $job_cfg_file \
    --result_dir $result_dir  \
    --name $job_name    \
    --run_id $job_counter  \
    --gpu "$gpu_number"
In our approach 8 GPUs where used to train nucleus and mitochondria models, while in tubulin and actin we used 4 and 3 GPUs respectively due the amount of data available. For multi-GPU training you can call BiaPy as follows:
# First check where is your biapy command (you need it in the below command)
# $ which biapy
# > /home/user/anaconda3/envs/BiaPy_env/bin/biapy

gpu_number="0, 1, 2"
python -u -m torch.distributed.run \
    --nproc_per_node=3 \
    /home/user/anaconda3/envs/BiaPy_env/bin/biapy \
    --config $job_cfg_file \
    --result_dir $result_dir  \
    --name $job_name    \
    --run_id $job_counter  \
    --gpu "$gpu_number"
nproc_per_node need to be equal to the number of GPUs you are using (e.g. gpu_number length).
Results
The results are placed in results folder under --result_dir directory with the --name given. All the images are stored in a folder called per_image. You should see there images like the ones depicted below:
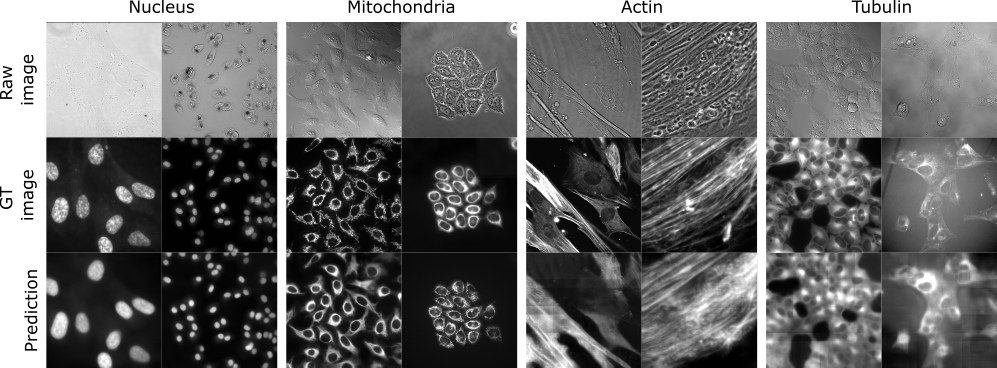
Results on the LightMyCells challenge of our approach.