SpineDL-Neuron: Neuron segmentation in the mouse spinal cord
This tutorial shows how to run SpineDL-Neuron, the instance segmentation model developed in the manuscript [9]. The goal of this workflow is the automatic neuron segmentation of the mouse spinal cord from fluorescence images stained with DAPI and NeuN.

SpineDL-Neuron image sample with two channels: DAPI (channel 1) and NeuN (channel 2). |
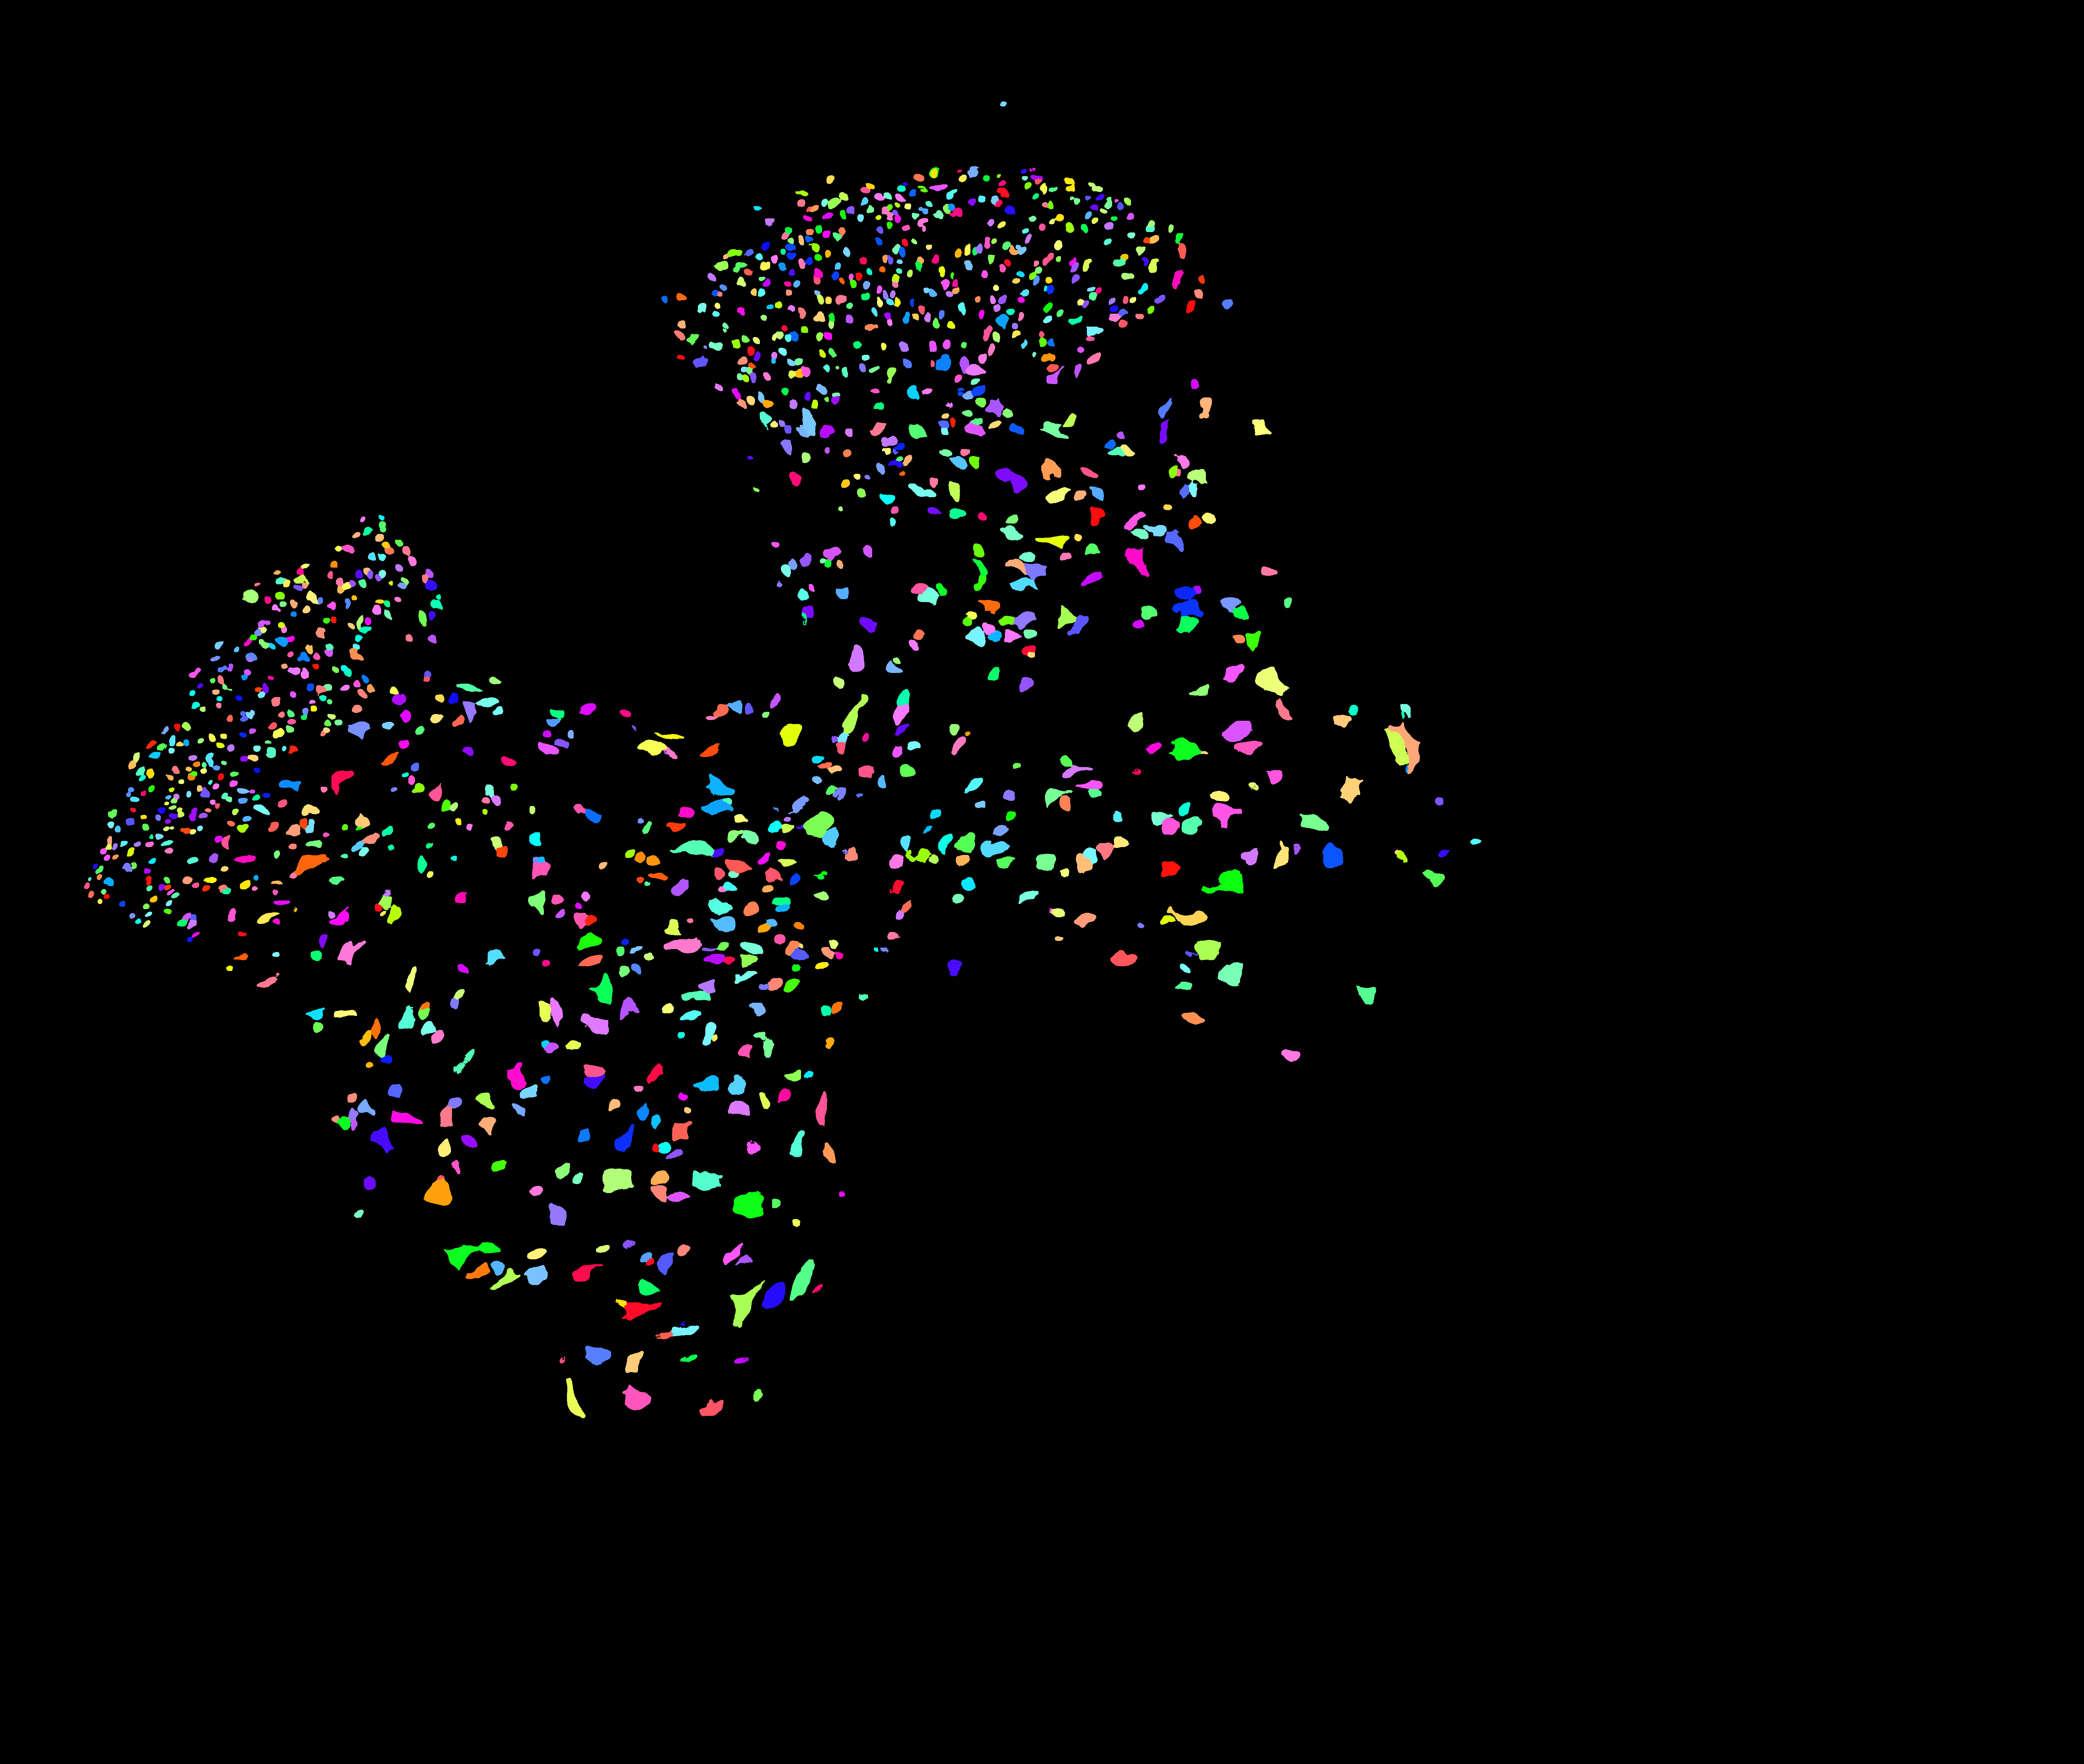
Its corresponding instance mask, where each neuron is represented with a different color. |
Note
This tutorial covers only the instance segmentation module (SpineDL-Neuron). A separate tutorial will cover instance segmentation with SpineDL-Structure. See: SpineDL-Structure: Anatomical structures of the mouse spinal cord.
Dataset
The dataset consists of more than 160 confocal images of mouse spinal cord tissue stained with NeuN (neuronal somas) and DAPI (nuclei). Images were acquired as
mosaics of Z-stacks and converted to 2-channel TIFF files (channel 1: DAPI, channel 2: NeuN). Find a further description of the dataset, as well as the link to download it, in Zenodo.
The dataset will contain two directories called Structure identification and Neuron identification. This tutorial focuses on the latter. The directory neuron should look like this:
How to use SpineDL-Neuron
You can use the pretrained SpineDL-Neuron model to predict new images using several methods supported by BiaPy. You will need to follow the following steps:
Prepare your images according to the model requirements:
2D images with 2 channels (channel 1: DAPI, channel 2: NeuN). The order of the channels is important!
The expected image resolution is from
0.445to0.891µm/pixel. If your images differ from this range, you should rescale them accordingly before running inference with the model.If you have doubts you can check the dataset provided to see examples of images used in our work. If you have any questions regarding image preparation, please contact us through the Image.sc Forum , using
biapytag, or through our GitHub issues page.Note
Here you can also use the images included in the
test/rawfolder of the provided dataset to test the model.
Decide which method you want to use to run BiaPy: GUI, Jupyter/Colab, Galaxy, Docker, CLI, or API. Based on that you will need to follow the installation instructions described in the Installation section.
Download the yaml configuration file for SpineDL-Neuron from here, which is already prepared to load the pretrained model, called ‘proactive-snail’, from the BioImage Model Zoo.
Then follow the instructions corresponding to your selected method to run BiaPy with the downloaded configuration file.
To begin, please follow these steps within the Graphical User Interface (GUI) (version 1.2.2 or later):
Click on
"Load and modify workflow"button in BiaPy GUI and load the downloaded YAML configuration file.If some of the paths in the YAML are not valid, you will be redirected to this window to modify them.
Once that all the paths are valid, you can change the configuration filename if you want and click on
"Save file".You will be redirected to the
"Run Workflow"window. The recently loaded YAML configuration will be selected automatically, and a job name will be pre-filled based on the configuration filename. Next, select an output folder where all results will be saved.Then, you can optionally check the configuration file consistency before running BiaPy by clicking on the
"Check file"button.Start the workflow by clicking the
"Run"button.
Find a depiction of these steps below:
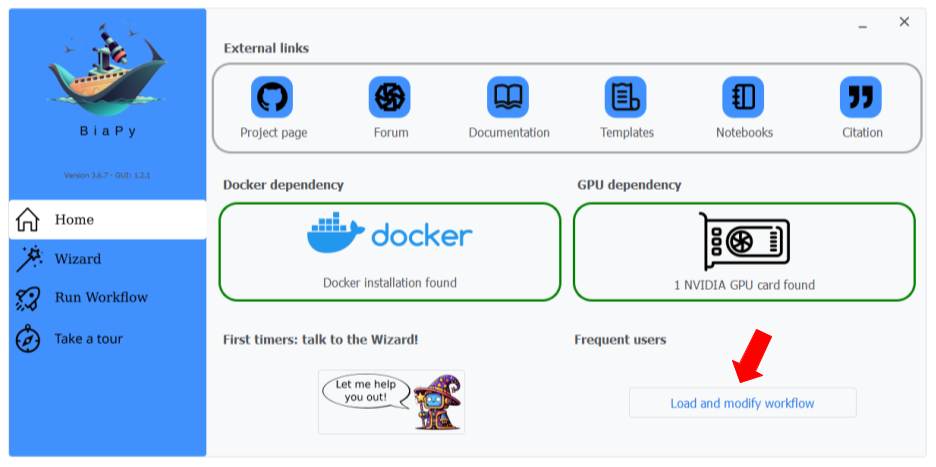
Step 0: Click on "Load and modify workflow" and load the SpineDL-Neuron YAML configuration file.
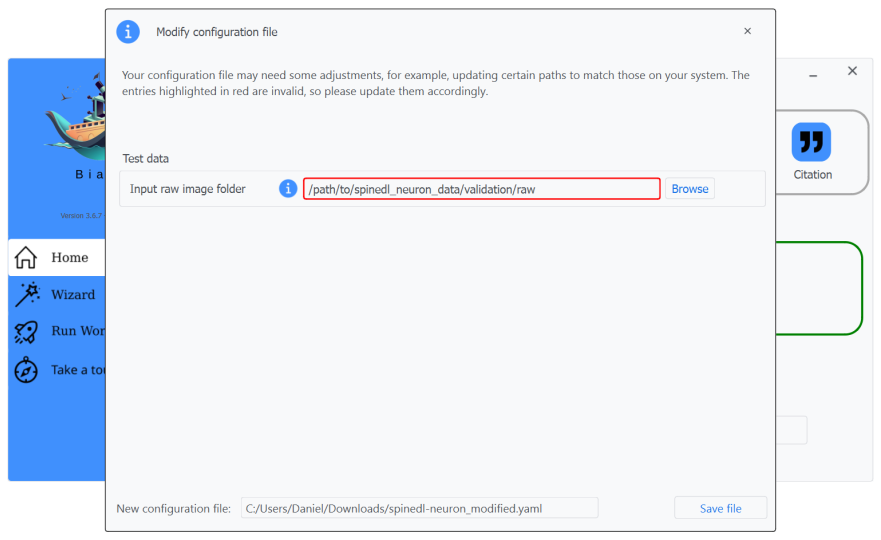
Step 1: If some of the paths in the YAML are not valid, you will be redirected to this window to modify them.

Step 2: You can change the configuration filename if you want and click on "Save file".
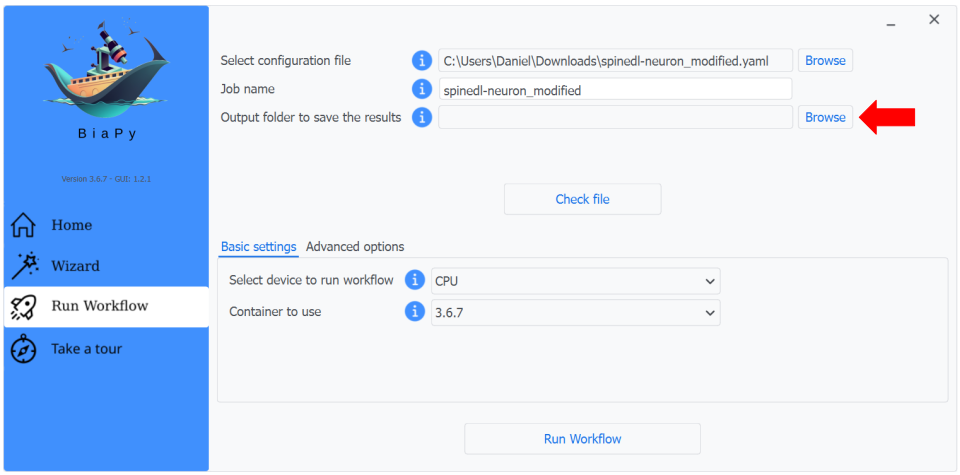
Step 3: The recently loaded YAML configuration will be selected automatically, and a possible job name. Next, select an output folder where all results will be saved.
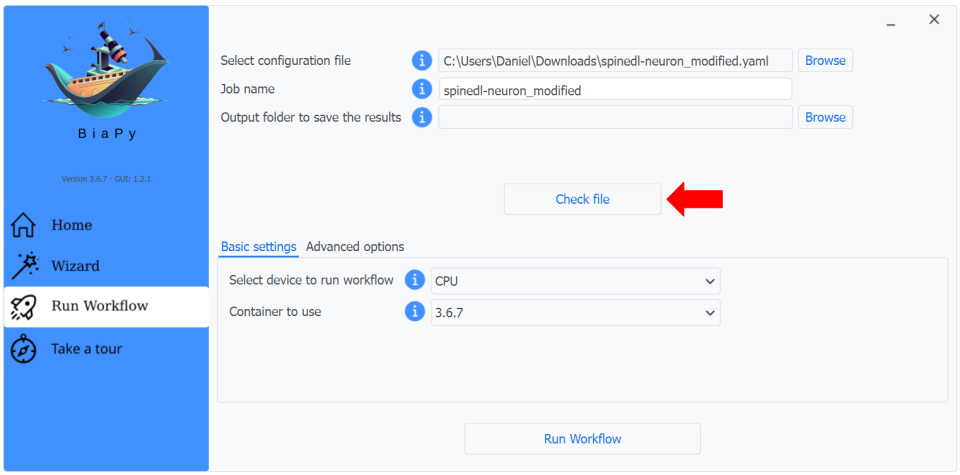
Step 4: You can optionally check the configuration file consistency by clicking the "Check file" button.

Step 5: Finally, you can start the workflow by clicking the "Run" button.
You can predict new images using the pretrained model in a Jupyter or Colab notebook. Follow these steps:
Open our notebook prepared to do inference with the pretrained models here.
Upload the downloaded yaml configuration file to the Colab environment as explained in the notebook.
Follow the instructions in the notebook to run inference with the pretrained SpineDL-Neuron model.
Open BiaPy tool in Galaxy ToolShed at this link. If you are not familiar with Galaxy, you can check the Galaxy tutorials for further information on how to use it.
Upload your images and the downloaded configuration file to Galaxy.
For the question
"Do you have a configuration file?"select"Yes, I already have one and I want to run BiaPy directly".Select the uploaded configuration file in the
"Select a configuration file"option.Leave
"Select the model checkpoint (if needed)"empty, as the configuration file is already prepared to use the pretrained SpineDL-Neuron model that will be downloaded automatically from the BioImage Model Zoo.Leave
"If train is enabled, select the training images"empty, as we are not going to train the model.Then, in the section
"If test is enabled, select the test images"select the images you want to predict under"Specify the test raw images". We are assuming you don’t have the ground truth masks for those images, so leave"Specify the test ground truth masks (if available)"empty.In the output selection section, select
"Test predictions (if exist)"and"Post-processed test predictions (if exist)"to download the predicted masks.Finally, run the job.
Modify the configuration file to set the correct paths to the training, validation, and test data included in the dataset. For example, if you extracted the dataset to
/home/user/SpineDL/, you will need to set the following paths in the configuration file:DATA: TRAIN: PATH: "/home/user/SpineDL/Neuron identification/train/raw/" GT_PATH: "/home/user/SpineDL/Neuron identification/train/label/" VAL: PATH: "/home/user/SpineDL/Neuron identification/validation/raw/" GT_PATH: "/home/user/SpineDL/Neuron identification/validation/label/" TEST: PATH: "/home/user/SpineDL/Neuron identification/test/raw/"
Execution requires BiaPy version
3.6.8or newer. Please run the command below, taking care to configure the relevant file paths:# Configuration file job_cfg_file=/home/user/spinedl_neuron.yaml # Path to the data directory data_dir=/home/user/data # Where the experiment output directory should be created result_dir=/home/user/exp_results # Just a name for the job job_name=my_spinedl_neuron_test # Number that should be increased when one need to run the same job multiple times (reproducibility) job_counter=1 # Number of the GPU to run the job in (according to 'nvidia-smi' command) gpu_number=0 docker run --rm \ --gpus "device=$gpu_number" \ --mount type=bind,source=$job_cfg_file,target=$job_cfg_file \ --mount type=bind,source=$result_dir,target=$result_dir \ --mount type=bind,source=$data_dir,target=$data_dir \ biapyx/biapy:latest-11.8 \ biapy \ --config $job_cfg_file \ --result_dir $result_dir \ --name $job_name \ --run_id $job_counter \ --gpu "$gpu_number"
This will generate the results in
/home/user/exp_results/my_spinedl_neuron_test/my_spinedl_neuron_test_1/results. Specifically, in that folder you will find the predicted masks for the test images underper_image_instancesand the post-processed images underper_image_post_processing.
Modify the configuration file to set the correct paths to the training, validation, and test data included in the dataset. For example, if you extracted the dataset to
/home/user/SpineDL/, you will need to set the following paths in the configuration file:DATA: TRAIN: PATH: "/home/user/SpineDL/Neuron identification/train/raw/" GT_PATH: "/home/user/SpineDL/Neuron identification/train/label/" VAL: PATH: "/home/user/SpineDL/Neuron identification/validation/raw/" GT_PATH: "/home/user/SpineDL/Neuron identification/validation/label/" TEST: PATH: "/home/user/SpineDL/Neuron identification/test/raw/"
Execution requires BiaPy version
3.6.8or newer. Please run the command below, taking care to configure the relevant file paths:# Configuration file job_cfg_file=/home/user/spinedl_neuron.yaml # Where the experiment output directory should be created result_dir=/home/user/exp_results # Just a name for the job job_name=my_spinedl_neuron_test # Number that should be increased when one need to run the same job multiple times (reproducibility) job_counter=1 # Number of the GPU to run the job in (according to 'nvidia-smi' command) gpu_number=0 # Load the environment conda activate BiaPy_env biapy \ --config $job_cfg_file \ --result_dir $result_dir \ --name $job_name \ --run_id $job_counter \ --gpu "$gpu_number"
This will generate the results in
/home/user/exp_results/my_spinedl_neuron_test/my_spinedl_neuron_test_1/results. Specifically, in that folder you will find the predicted masks for the test images underper_image_instancesand the post-processed images underper_image_post_processing.
Modify the configuration file to set the correct paths to the training, validation, and test data included in the dataset. For example, if you extracted the dataset to
/home/user/SpineDL/, you will need to set the following paths in the configuration file:DATA: TRAIN: PATH: "/home/user/SpineDL/Neuron identification/train/raw/" GT_PATH: "/home/user/SpineDL/Neuron identification/train/label/" VAL: PATH: "/home/user/SpineDL/Neuron identification/validation/raw/" GT_PATH: "/home/user/SpineDL/Neuron identification/validation/label/" TEST: PATH: "/home/user/SpineDL/Neuron identification/test/raw/"
Execution requires BiaPy version
3.6.8or newer. You can plug-in the following code into your Python scripts in order to run the workflow:from biapy import BiaPy # Set up your parameters config_path = "/path/to/config.yaml" # Path to your YAML configuration file result_dir = "/home/user/exp_results" # Directory to store the results job_name = "my_spinedl_neuron_test" # Name of the job run_id = 1 # Run ID for logging/versioning gpu = "0" # GPU to use (as string, e.g., "0") # Create and run the BiaPy job biapy = BiaPy(config_path, result_dir=result_dir, name=job_name, run_id=run_id, gpu=gpu) biapy.run_job()
This will generate the results in
/home/user/exp_results/my_spinedl_neuron_test/my_spinedl_neuron_test_1/results. Specifically, in that folder you will find the predicted masks for the test images underper_image_instancesand the post-processed images underper_image_post_processing.
Reproducing SpineDL-Neuron from scratch
If you want to reproduce the results of SpineDL-Neuron using the provided dataset, you can follow the steps described below. We assume here some level of expertise so we describe it how to do it using the CLI and also assume you have already installed BiaPy.
Download the dataset from Zenodo and extract it to a desired location.
Download the yaml configuration file for SpineDL-Neuron from here. Notice that this configuration file is slightly different from the one used for inference, as it is prepared to train the model from scratch.
Modify the configuration file to set the correct paths to the training, validation, and test data included in the dataset. For example, if you extracted the dataset to
/home/user/SpineDL/, you will need to set the following paths in the configuration file:DATA: TRAIN: PATH: "/home/user/SpineDL/Neuron identification/train/raw/" GT_PATH: "/home/user/SpineDL/Neuron identification/train/label/" VAL: PATH: "/home/user/SpineDL/Neuron identification/validation/raw/" GT_PATH: "/home/user/SpineDL/Neuron identification/validation/label/" TEST: PATH: "/home/user/SpineDL/Neuron identification/test/raw/"
Run BiaPy using the CLI as described below:
# Configuration file
job_cfg_file=/home/user/spinedl-neuron-from-scratch.yaml
# Where the experiment output directory should be created
result_dir=/home/user/exp_results
# Just a name for the job
job_name=my_spinedl_neuron_from_scratch
# Number that should be increased when one need to run the same job multiple times (reproducibility)
job_counter=1
# Number of the GPU to run the job in (according to 'nvidia-smi' command)
gpu_number=0

# Load the environment
conda activate BiaPy_env

biapy \
      --config $job_cfg_file \
      --result_dir $result_dir  \
      --name $job_name    \
      --run_id $job_counter  \
      --gpu "$gpu_number"
This will generate the results in
/home/user/exp_results/my_spinedl_neuron_from_scratch/my_spinedl_neuron_from_scratch_1/results. Specifically, in that folder you will find the predicted masks for the test images underper_image_instancesand the post-processed images underper_image_post_processing.Finally, you can evaluate the predictions for test images using this script. You will need to provide the path to the predicted masks and the root folder containing the expert annotations for the test set. For example:
python -u agreement_manual_points_vs_SpineDL-neuron_instances.py \
   --pred_folder "/home/user/exp_results/my_spinedl_neuron_from_scratch/my_spinedl_neuron_from_scratch_1/results/per_image_post_processing/" \
   --manual_annotation_dir "/home/user/Neuron identification/test/label" \
This script will generate the Figure 6 of [9] showing the agreement between manual and SpineDL-Neuron identifications with tolerance-aware matching.
If you want to compare the performance of SpineDL-Neuron with CellSense, you can download the CellSense predictions from here and run the following script.:
python -u agreement_manual_points_vs_SpineDL-neuron_vs_CellSense_instances.py \
   --spinedl_pred_folder "/home/user/exp_results/my_spinedl_neuron_from_scratch/my_spinedl_neuron_from_scratch_1/results/per_image_post_processing/" \
   --cellsense_pred_folder "/home/user/cellSense" \
   --manual_annotation_dir "/home/user/Neuron identification/test/label"